Redux05 Redux-Saga

想用Umi.js,发现Dva不了解,学习Dva,发现应该懂一些Redux-Saga,所以花了几天时间搞清楚Redux-Saga的基本原理,这就是我的学习笔记。

简介

redux-saga是用来管理应用程序副作用的库,可以认为,一个saga就像是应用程序中一个单独的线程,独自负责处理副作用。

redux-saga是一个Redux中间件,也就意味着这个线程可以通过正常的Redux的Action从主应用启动暂停和取消,它能够访问完整的Redux的State,也可以进行dispatch

redux-saga使用了Generator,让异步流程看起来像是同步代码,有更强大的异步流程控制能力。

Hello Saga

安装:

1
2
3
npm install --save redux-saga
# 或者
yarn add redux-saga

创建sagas.js文件,我们的异步逻辑都会包含在这个文件中:

1
2
3
4
5
// sagas/index.js

export default function* helloSaga() {
console.log('Hello Sagas!');
}

Redux-Saga是一个中间件,我们需要建立它与Redux Store的联系,在store/configureStore.js中对store进行配置,注入中间件:

1
2
3
4
5
6
7
8
9
10
11
12
13
14
15
16
17
18
// store/configureStore.js

import { createStore, applyMiddleware } from 'redux';
import rootReducer from './reducers/index';

// 使用 redux-saga 中间件
import createSagaMiddleware from 'redux-saga';


export default function configureStore() {
// 创建 redux-saga 中间件
const sagaMiddleware = createSagaMiddleware();
return {
// 创建 Store,并注入中间件
...createStore(rootReducer, applyMiddleware(sagaMiddleware)),
runSaga: sagaMiddleware.run,
};
}

导出的store可以在main.js中或者store/index.js中进行实例化,执行挂载的中间件的初始化:

1
2
3
4
5
6
7
8
9
10
11
12
13
// store/index.js

import configureStore from '@/store/configureStore';
import rootSaga from '@/sagas';

// 对 Store 进行配置
const store = configureStore();

// 初始化 redux-saga 中间件,注入我们的 mySaga 文件
// 需要在创建 store 后才能运行
store.runSaga(rootSaga);

export default store;

可以结合react-redux,使用<Provider>注入store,配合connect使用:

1
2
3
4
5
6
7
8
9
10
11
12
13
14
// src/index.js

import React from 'react';
import ReactDOM from 'react-dom';
import { Provider } from 'react-redux'
import App from './containers/App'
import store from "./store";

render(
<Provider store={store}>
<App />
</Provider>,
document.getElementById('root'),
)

也可以直接在需要的地方导入store,正式的项目中推荐前者。

这样配置完成后,默认情况下就会打印出Hello Sagas

异步调用

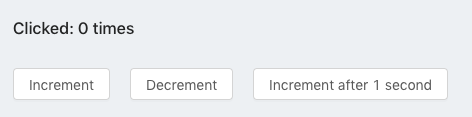
实现这样的一个组件,有三个按钮,其中两个是同步任务,另外一个按钮是异步任务,点击之后1秒计数才会增加:

UI组件:

1
2
3
4
5
6
7
8
9
10
const Counter = ({ value, onIncrement, onDecrement, onIncrementAsync }) => {
return (
<div>
<h1>Clicked: {value} times</h1>
<Button onClick={onIncrement} className={style.countButton}>Increment</Button>
<Button onClick={onDecrement} className={style.countButton}>Decrement</Button>
<Button onClick={onIncrementAsync} className={style.countButton}>Increment after 1 second</Button>
</div>
);
};

UI组件调用者需要通过Redux Store来获取数据、触发Action:

1
2
3
4
5
6
7
8
9
10
11
12
13
14
15
16
17
18
19
20
21
22
23
24
import React, { useEffect, useState } from 'react';
import store from '../../../store';

import { Button } from 'antd';

export default function ReduxSaga() {
const [count, setCount] = useState(store.getState().sagaCount);

const unsubscribe = store.subscribe(() => {
setCount(store.getState().sagaCount);
});

useEffect(() => {
return unsubscribe;
});

return (
<Counter value={count}
onIncrement={() => store.dispatch({ type: 'INCREMENT' })}
onDecrement={() => store.dispatch({ type: 'DECREMENT' })}
onIncrementAsync={() => store.dispatch({ type: 'INCREMENT_ASYNC' })}>
</Counter>
);
}

这里没有使用React-Redux提供的<Provider>connect来实现Store更新响应,而是使用了subscribe

在Reducer中:

1
2
3
4
5
6
7
8
9
10
11
12
13
14
15
16
17
18
19
20
21
import { combineReducers } from 'redux';

const sagaCount = (state = 0, action) => {
switch (action.type) {
case 'INCREMENT': {
return state + 1;
}
case 'DECREMENT': {
return state - 1;
}
default: {
return state;
}
}
};

const reducer = combineReducers({
sagaCount,
});

export default reducer;

正常的同步任务会直接被dispatchReducer中,可以获得同步的state结果,但是异步任务对应的Action Type(INCREMENT_ASYNC)在Reducer中是没有定义的,因为异步任务由Redux-Saga接管。

sagas.js中,我们有了一个helloSaga的Generator函数,现在需要定义这个异步任务对应的方法:

1
2
3
4
5
6
7
8
9
10
11
12
13
14
import { put, takeEvery } from 'redux-saga/effects';
const delay = ms => new Promise(resolve => setTimeout(resolve, ms));

// worker Saga:一个用来执行异步操作的 Generator 函数
// 执行异步任务,在 delay 结束后出发同步的 action
function* incrementAsync() {
yield delay(1000);
yield put({ type: 'INCREMENT' });
}

// watcher Saga: 在每个 INCREMENT_ASYNC 的 action 被 dispatch 时调用 worker Saga
export function* watchIncrementAsync() {
yield takeEvery('INCREMENT_ASYNC', incrementAsync);
}

前面提到了,Saga相当于系统的一个进程,而watchIncrementAsync就是这个进程中的一个监听器,它的作用是用来监听Type为INCREMENT_ASYNC的Action,当这个Action被触发时,就会执行这个Watcher中的代码。

这个监听器需要在进程中被启动,实际上sagaMiddleware.run方法就是来执行所有的监听器,现在我们已经有了一个监听器helloSaga,要添加watchIncrementAsync,可以使用Redux-Saga内置的all方法:

1
2
3
4
5
6
export default function* root() {
yield all([
helloSaga(),
watchIncrementAsync(),
]);
}

all接受一个数组作为参数,数组中的Generator函数会同时启动,在watchIncrementAsync启动之后,执行了takeEvery方法,takeEvery也是Redux-Saga内置函数,用来监听所有的INCREMENT_ASYNC的Action,与takeEvery类似的是takeLatest方法,都是用来监听Action,二者的区别是:

  • takeEvery在每个对应的Action触发后,回调函数都会被执行,可以并发执行多个异步任务
  • takeLatest不允许并发,如果在之前已经有一个INCREMENT_ASYNC的Action在处理中,那么处理中的这个Action会被取消,执行当前的Action

监听函数中执行的incrementAsync是实际执行异步任务的Generator函数,delay是一个异步函数,它会返回一个Promise到Redux-Saga中间件,阻塞Generator的执行,当1秒后,delay的Promise会被resolve,这是Generator会恢复执行,下一个yield后的put方法会被执行,发起Type为INCREMENT的Action。

Effect

Effect是具有副作用的函数,比如上面的异步操作。在Saga内触发的异步操作都是有yield一些声明式的Effect来完成的。

一个Saga所做的实际上就是组合所有的Effect,实现对流程的控制。最简单情况就是把yield一个接一个的放置来顺序执行Effect,复杂的情况就是使用条件语句来实现复杂的控制流。

使用Effect(例如call或者put)结合takeEvery,相比直接触发Promise(例如Redux-thunk),实现的结果是类似的,但是代码更清晰,同时更易于测试。

测试

由于每个Saga都是Generator函数,在每个yield都会停下,只有手动执行next才会向下执行,这就为我们提供了分步骤的对异步任务进行测试的能力。

一个Generator函数执行的时候回返回一个Iterator Object,这个Iterator的next方法返回如下格式的对象:

1
gen.next() // => { done: boolean, value: any }

例如下面这一个Generator函数:

1
2
3
4
5
6
7
8
9
10
11
function* fn() {
const a = yield 1;
yield a + 2;
return 999;
}

const gen = fn();

gen.next(); // { value: 1, done: false }
gen.next(100); // { value: 102, done: false }
gen.next(); // { value: 999, done: true }

每一次的next返回值都是可测试的(注意,在Generator函数内部,yield本身是没有返回值的,它的作用是向函数外的next()传递value属性,而next()的参数才是想函数内部传递,作为上一步的yield的返回值)

了解这一点后,可以对我们上面的incrementAsync进行测试:

1
2
3
4
5
it('incrementAsync Saga test ', () => {
const gen = incrementAsync();

expect(gen.next()).toEqual({done: false, value: /*???*/ });
});

现在关键点就是value的值是什么了,delay(1000)返回的是一个Promise,我们没有办法直接在Promise之间做简单的相等测试,所以需要Mock这个Promise的返回结果,mock的函数并不会真正发送Ajax请求或者执行其他异步操作,而是执行检查是否使用正确的参数调用了Promise的API。

Mock使测试更加困难和不可靠,但是如果dalay返回的一个非Promise对象,那么事情就简单了。

redux提供了另一种方式,来代替直接返回Promise,那就是call方法,它与delay(以及其他直接返回Promise的方法)相比的不同之处在于:

当执行yield delay(1000)yield后的表达式在传递给next的调用者之前就被执行了,所以得到的是一个Promise。但是执行yield call(delay, 1000)时,yield后的表达式call(dalay, 1000)传递给next的调用者,它返回的是一个Effect,告诉Redux-Saga中间件将1000传递给delay

实际上,无论call还是put都会不执行任何dispatch或者异步调用,他们只是简单的返回一个对象

1
2
put({ type: 'INCREMENT' }) // => { PUT: {type: 'INCREMENT'} }
call(delay, 1000) // => { CALL: {fn: delay, args: [1000]}}

中间件会检查每个被yield的Effect的类型,如果是put,那么中间件就dispatch一个Action到Store,如果是call那么就会调用传入的参数。

这种把创建Effect和执行Effect执行分开的做法,让我们可以简单的测试Generator:

1
2
3
4
5
6
7
8
9
10
import { incrementAsync } from '@/sagas';
import { put, call } from 'redux-saga/effects';
import { delay } from '@/utils';

it('incrementAsync Saga test ', () => {
const gen = incrementAsync();
expect(gen.next()).toEqual({ done: false, value: call(delay, 1000) });
expect(gen.next()).toEqual({ done: false, value: put({ type: 'INCREMENT' }) });
expect(gen.next()).toEqual({ done: true });
});

至于call(delay, 1000)的结果是否正常,首先call方法应该是由redux-saga来保证的,我们只需要对delay方法进行单独测试即可

常用API

Redux-Saga提供了一些辅助函数,帮助我们轻松实现一些常用的功能:

(1)takeEvery

1
takeEvery(type, callback)

前面提到了,它是提供了类似redux-thunk的行为,简单来说就是当type的Action被dispatch时,去执行callback方法,相当于一个监听器。在每个对应的Action触发后,回调函数都会被执行,可以并发执行多个异步任务

如果有多个Saga监视不同的Acteion,可以创建多个观察者:

1
2
3
4
5
6
7
8
9
10
11
12
13
import { takeEvery } from 'redux-saga/effects'

// FETCH_USERS
function* fetchUsers(action) { ... }

// CREATE_USER
function* createUser(action) { ... }

// 同时使用它们
export default function* rootSaga() {
yield takeEvery('FETCH_USERS', fetchUsers)
yield takeEvery('CREATE_USER', createUser)
}

(2)takeLatest

1
takeLatest(type, callback)

takeEvery不同,在任何时刻takeLatest都只允许同一个typeAction执行,如果已经有一个任务在执行的时候,启动另一个任务,那么之前的任务会被取消。

(3)put

1
put({ type: 'TYPE' })

返回一个声明式的Dispatch Effect,效果是dispatch一个TYPEAction到Store

(4)call

1
call(fn, arg1, arg2, ...)

返回一个声明式的Effect,效果是调用传入的第一个参数(函数)(可以是Promise也可以是另外的Generator函数),并将其他的参数作为函数的参数传入

也支持调用对象的方法,可以使用下面的形式,未调用的函数提供this上下文:

1
call([obj, obj.method], arg1, arg2, ...) // 如同 obj.method(arg1, arg2 ...)

(5)apply

1
apply(obj, obj.method, [arg1, arg2, ...])

用于调用对象的方法,与call效果相同

(6)cps

callapply非常适合Promise结果的函数,但是如果是Node风格的函数(例如fn(...args, callback))的callback(error, result) => ()的形式。 cps表示的是延续传递风格,例如:

1
2
3
import { cps } from 'redux-saga/effects'

const content = yield cps(readFile, '/path/to/file')

(7)select

1
select(selector, ...args)

创建一个Effect,用来命令中间件在state上调用selector,返回对应的结果,效果相当于select(getState(), ...args)

例如,下面的代码,执行的就是将loading传入selector内,selector返回state或者state的某些属性

1
2
3
4
const state = yield select((state, a) = > {
console.log(a); // loading
return state.sagaAnswer
}, 'loading');

当没有传入selector时,会返回完整的state(与调用getState()结果相同)

错误处理

可以使用try/catch在Saga中捕获错误:

1
2
3
4
5
6
7
8
9
10
11
12
13
14
import Api from './path/to/api'
import { call, put } from 'redux-saga/effects'

// ...

function* fetchProducts() {
try {
const products = yield call(Api.fetch, '/products')
yield put({ type: 'PRODUCTS_RECEIVED', products })
}
catch(error) {
yield put({ type: 'PRODUCTS_REQUEST_FAILED', error })
}
}

上面提高过,在Generator函数内部,yield本身的返回值是由next方法传入进去的,所以在测试异步测试的返回结果时,只需要通过next方法传入我们模拟的响应结果即可。测试异常结果时,使用Generator的throw方法并传入模拟的错误对象即可,throw方法会中断Generator的执行流,并跳转到catch

1
2
3
4
5
6
7
8
9
10
11
12
13
14
15
16
17
18
19
20
21
22
23
24
25
26
27
28
29
30
31
32
33
describe('fetchAnswerAsync Saga test ', () => {
it('fetch succeed', () => {
const gen = fetchAnswerAsync({ payload: { question: 'hello' }});
expect(gen.next()).toEqual({ done: false, value: put({ type: 'THINKING' }) });
expect(gen.next()).toEqual({ done: false, value: call(Request.getAnswer, { question: 'hello' }) });
// mock success response
const res = { answer: 'saga', image: 'ok' };
expect(gen.next(res)).toEqual({
done: false,
value: put({
type: 'ASK_QUESTION_SUCCEEDED',
payload: res,
})
});
expect(gen.next()).toEqual({ done: true });
});

it('fetch fail', () => {
const gen = fetchAnswerAsync({ payload: { question: 'hello' }});
expect(gen.next()).toEqual({ done: false, value: put({ type: 'THINKING' }) });
expect(gen.next()).toEqual({ done: false, value: call(Request.getAnswer, { question: 'hello' }) });
// mock error response
const error = { message: 'something wrong...' };
expect(gen.throw(error)).toEqual({
done: false,
value: put({
type: 'ASK_QUESTION_FAILED',
payload: error,
})
});
expect(gen.next()).toEqual({ done: true });
});
});

当然不一定要在try...catch中处理错误,也可以让API封装方法返回一个正常的含有错误标识的值,将错误集中处理、提示(就像Vue项目中使用Axios的响应拦截器中完成的一样),然后返回一个正常的含有错误标识的值,暴露给业务调用者,方便业务调用者进行特殊化的处理:

1
2
3
4
5
6
7
8
9
10
11
12
13
14
15
import Api from './path/to/api'
import { call, put } from 'redux-saga/effects'

function fetchProductsApi() {
return Api.fetch('/products')
.then(response => ({ response }))
.catch(error => ({ error }))
}

function* fetchProducts() {
const { response, error } = yield call(fetchProductsApi)
if (response)
yield put({ type: 'PRODUCTS_RECEIVED', products: response })
else
yield put({ type: 'PRODUCTS_REQUEST_FAILED', error })

高级技巧

take

takeEvery就是建立在take基础上的高阶API,take的功能更前大,让我们通过全面控制Action观察进程来构建复杂的控制流。

比如下面的例子,它是一个简单的日志记录器,使用了takeEvery('*'),接受一个通配符,就可以捕获所有类型的Acetion:

1
2
3
4
5
6
7
8
function* watchAndLog() {
yield takeEvery('*', function* logger(action) {
const state = yield select();

console.log('action', action);
console.log('state after', state);
});
}

使用take同样可以实现相同的功能:

1
2
3
4
5
6
7
8
9
10
11
import { select, take } from 'redux-saga/effects'

function* watchAndLog() {
while (true) {
const action = yield take('*')
const state = yield select()

console.log('action', action)
console.log('state after', state)
}
}

take会创建一个Effect,之后后它会被暂停,直到另一个匹配的Action被发起了才会继续执行,所以我们上面的无限循环的Action才会行得通。take的返回值就是Action对象:

1
2
3
4
5
6
{
type: 'INCREMENT',
payload: {
id: 123
}
}

使用take让我们对流程的控制能力更加强大,使用takeEvery时,被调用的任务无法控制何时被调用,也无法控制何时停止监听。但是在take中,我们可以看做是Saga主动『拉取』Action的,这样反向的控制让我们可以实现更复杂的流程控制。

例如,在Todo应用中,我们希望监听用户的操作,并在用户初次创建完三条 Todo 信息时显示祝贺信息:

1
2
3
4
5
6
7
8
import { take, put } from 'redux-saga/effects'

function* watchFirstThreeTodosCreation() {
for (let i = 0; i < 3; i++) {
const action = yield take('TODO_CREATED')
}
yield put({type: 'SHOW_CONGRATULATION'})
}

当循环3次后,Saga会put一个SHOW_CONGRATULATION的Effect,然后这个函数就结束了使命,相当于这个监听器停止了监听。

使用take主动拉取的好处是,可以使用同步的风格来描述我们的控制流。例如想要实现一个登陆控制流LOGINLOGOUT,使用takeEvery我们必须写两个分别的任务,一个用于登陆,一个用于登出

这样本来应该是顺序的流程,代码被强行分割了(理想情况下,一个良好的控制流应该始终强制执行顺序一致的Actions,不应该出现意料之外的Action)

使用take,可以将控制流集中在一个Generator函数中:

1
2
3
4
5
6
7
8
9
10
11
12
13
14
15
16
17
18
19
20
21
22
23
24
import { take, call, put } from 'redux-saga/effects'
import Api from '...'

function* authorize(user, password) {
try {
const token = yield call(Api.authorize, user, password)
yield put({type: 'LOGIN_SUCCESS', token})
return token
} catch(error) {
yield put({type: 'LOGIN_ERROR', error})
}
}

function* loginFlow() {
while(true) {
const {user, password} = yield take('LOGIN_REQUEST')
const token = yield call(authorize, user, password)
if(token) {
yield call(Api.storeItem({token}))
yield take('LOGOUT')
yield call(Api.clearItem('token'))
}
}
}

上面的代码有几点可以学习:

  1. loginFlow在一个while(true)循环中实现所有流程,也就是说,一旦流程达到最后一步(LOGOUT),函数会等待一个新的LOGIN_REQUESTAction来启动新的迭代
  2. takepayload中获取到对应的参数
  3. call可以用来调用其他Generator函数,loginFlow会等待authorize返回或终止)
  4. 整个登陆、登出逻辑在一个函数中,就像同步代码一样,它们的自然顺序确定了执行步骤

但是上面的代码有一个小问题,当在登陆过程中,等待authorize返回值的器件,如果用户点击了登出按钮,触发了LOGOUT的Action,那么这个Action就会被忽略:

1
2
3
4
5
6
7
8
9
UI                              loginFlow
--------------------------------------------------------
LOGIN_REQUEST...................call authorize.......... waiting to resolve
........................................................
........................................................
LOGOUT.................................................. missed!
........................................................
................................authorize returned...... dispatch a `LOGIN_SUCCESS`!!
........................................................

造成这个问题的原因就是因为在yield call(authorize, user, password)是一个会阻塞的Effect,即在Generator调用结束之前不能执行或处理其他任何事情。

但是为了解决上面的问题,我们不仅希望loginFlow执行授权调用,也想监听可能发生在调用未完成之前的LOGOUT的Action,因为它们是并发的关系(当然如果使用takeEvery可以实现,但是流程会被打散)

我们可以使用Redux-Saga提供的另一个Effect:fork,当我们fork一个任务,任务会在后台启动,调用者可以继续自己的流程,而不用等待fork的结果。

但是如果将yield call(authorize, user, password)改为yield fork(authorize, user, password),代码可以继续向下执行,监听LOGOUT,但是登陆所需要的token也无法获取到了,所以需要将对token的操作移动到authorize内部:

1
2
3
4
5
6
7
8
9
10
11
12
13
14
15
16
17
18
19
20
import { fork, call, take, put } from 'redux-saga/effects'
import Api from '...'

function* authorize(user, password) {
try {
const token = yield call(Api.authorize, user, password)
yield put({type: 'LOGIN_SUCCESS', token})
} catch(error) {
yield put({type: 'LOGIN_ERROR', error})
}
}

function* loginFlow() {
while(true) {
const {user, password} = yield take('LOGIN_REQUEST')
yield fork(authorize, user, password)
yield take(['LOGOUT', 'LOGIN_ERROR'])
yield call(Api.clearItem('token'))
}
}

另外,在fork后面,我们使用了take并传入了一个数组,它的意思是监听两个并发的Action,会有下面三种情况:

  • 如果authorize在用户登出之前成功了,那么它会发起一个LOGIN_SUCCESSAction,然后结束。此时loginFlowSaga只会等待一个未来的LOGOUTAction被发起
  • 如果authorize在用户登出之前失败了,那么它会发起一个LOGIN_ERRORAction,然后结束。此时loginFlowSaga接受到LOGIN_ERROR的Action,执行yield call(Api.clearItem('token'))(多执行一次,没有关系),然后进行下一个while循环,等待下一个LOGIN_REQUEST的Action
  • 如果在authorize之前,用户登出,那么loginFlow会受到LOGOUT的Action,也会进入下一个while循环

但是还有一个问题,第三种情况中,authorize任务还在进行当中,早晚会返回一个成功或者失败的Action,这将导致状态混乱,所以我们需要取消fork任务,可以使用另一个Effect来取消任务,那就是cancel

1
2
3
4
5
6
7
8
9
10
11
12
13
14
15
16
import { take, put, call, fork, cancel } from 'redux-saga/effects'

// ...

function* loginFlow() {
while(true) {
const {user, password} = yield take('LOGIN_REQUEST')
// fork return a Task object
const task = yield fork(authorize, user, password)
const action = yield take(['LOGOUT', 'LOGIN_ERROR'])
if (action.type === 'LOGOUT') {
yield cancel(task)
}
yield call(Api.clearItem('token'))
}
}

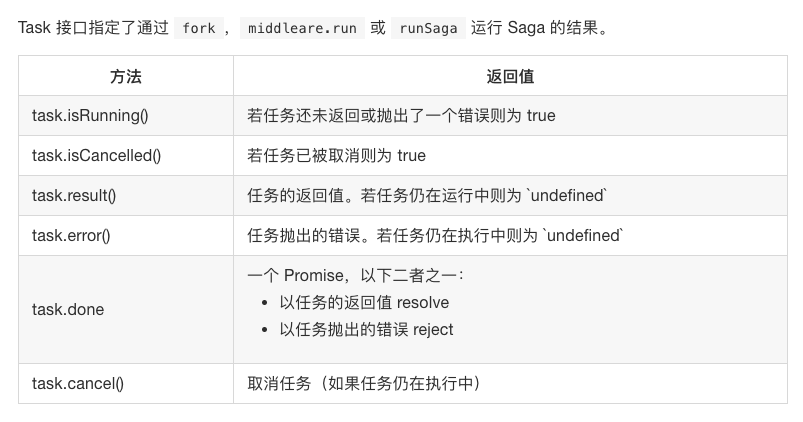
yield fork返回结果是一个Task Object,具有以下方法:

这样当收到登出的Action时,如果authorize在执行中会被取消,如果authorize已成功完成那么什么都不会发生,取消操作将是一个空操作,如果authorize完成发生错误也没有关系,因为loginFlow已经进入下一个循环

但是如果我们在Reducer中设置了loading状态,它这时的值为true,如果直接粗暴的结束了authrozie,由于我们没有触发Reducer中会改变loading状态的Action,loading的值不会改变,界面上仍然在转圈,状态又发生了不一致。

我们可以在authorize中处理这个情况,通过引入cancelled这个辅助函数,我们可以再finally中处理取消逻辑(以及其他类型的完成逻辑)

1
2
3
4
5
6
7
8
9
10
11
12
13
14
15
16
17
import { take, call, put, cancelled } from 'redux-saga/effects'
import Api from '...'

function* authorize(user, password) {
try {
const token = yield call(Api.authorize, user, password)
yield put({type: 'LOGIN_SUCCESS', token})
yield call(Api.storeItem, {token})
return token
} catch(error) {
yield put({type: 'LOGIN_ERROR', error})
} finally {
if (yield cancelled()) {
// ... put special cancellation handling code here
}
}
}

具体的清除loading状态,可以单独指定清除loading的Action,也可以在每次LOGOUT的Action中进行清除。

同时执行多个任务

yield会一个一个顺序执行任务:

1
2
3
// 错误写法,effects 将按照顺序执行
const users = yield call(fetch, '/users'),
repos = yield call(fetch, '/repos')

如果希望同时执行,需要使用Promise.all对应的辅助函数all,将任务放到数组中,Generator会阻塞到所有的Effects执行完成,或者某一个Effect被拒绝(就像Promise.all

1
2
3
4
5
6
7
import { call, all } from 'redux-saga/effects';

// 正确写法, effects 将会同步执行
const [users, repos] = yield all([
call(fetch, '/users'),
call(fetch, '/repos')
])

高级技巧

文档其实还介绍了race、组合Sagas、并发等高级技术,以后有时间、有需要再深入学习。要注意的是,中文文档与英文文档有一定差异,最好还是以英文文档为主。

TodoList

利用Redux-Saga做了一个TodoList的例子,源码在这个仓库里。

参考