今天在整理收藏夹时,发现有一个很不错的网站picdiet,可以用来压缩图片,效果很不错。
不过今天的练习不是关于图片压缩,而是它的官方的一个用来对比压缩前后图片的效果的组
题目
今天在整理收藏夹时,发现有一个很不错的网站picdiet,可以用来压缩图片,效果很不错。
不过今天的练习不是关于图片压缩,而是它的官方的一个用来对比压缩前后图片的效果的组件,效果如下:

试着在Vue中实现这个效果
分析
分几个模块来实现。在搭起架子后,首先实现中间的分割线,样式不难,两边的小三角也可以用border模拟实现
1
2
3
4
5
6
7
8
9
10
11
12
13
14
15
16
17
18
19
20
21
22
23
24
25
26
27
28
29
| .separator {
position: absolute;
top: 0;
left: 200px;
width: 4px;
height: 100%;
background: darkgray;
z-index: 3;
}
.separator:before, .separator:after {
content: '';
display: block;
position: absolute;
top: 50%;
width: 0;
height: 0;
border: 10px solid transparent;
}
.separator:before {
right: 10px;
border-right-color: darkgray;
}
.separator:after {
left: 10px;
border-left-color: darkgray;
}
|
然后需要实现随着鼠标的移动,分割线的位置也跟着移动,Vue的模板中可以直接设定它的left属性值即可:
1
| <div class="separator" :style="{ 'left': separatorX + 'px' }"></div>
|
计算separatorX的时候,用到了两个方法,第一个是getBoundingClientRect,它返回了六个属性,分别是元素的宽度高度以及距离适口左上角的各边距离。这个宽度与offsetWidth相同,等于width + bodrer + content,计算left等时是从border出发:

另外在给外围组件绑定mousemove事件的时候,需要获取鼠标的坐标,计算方式如下:
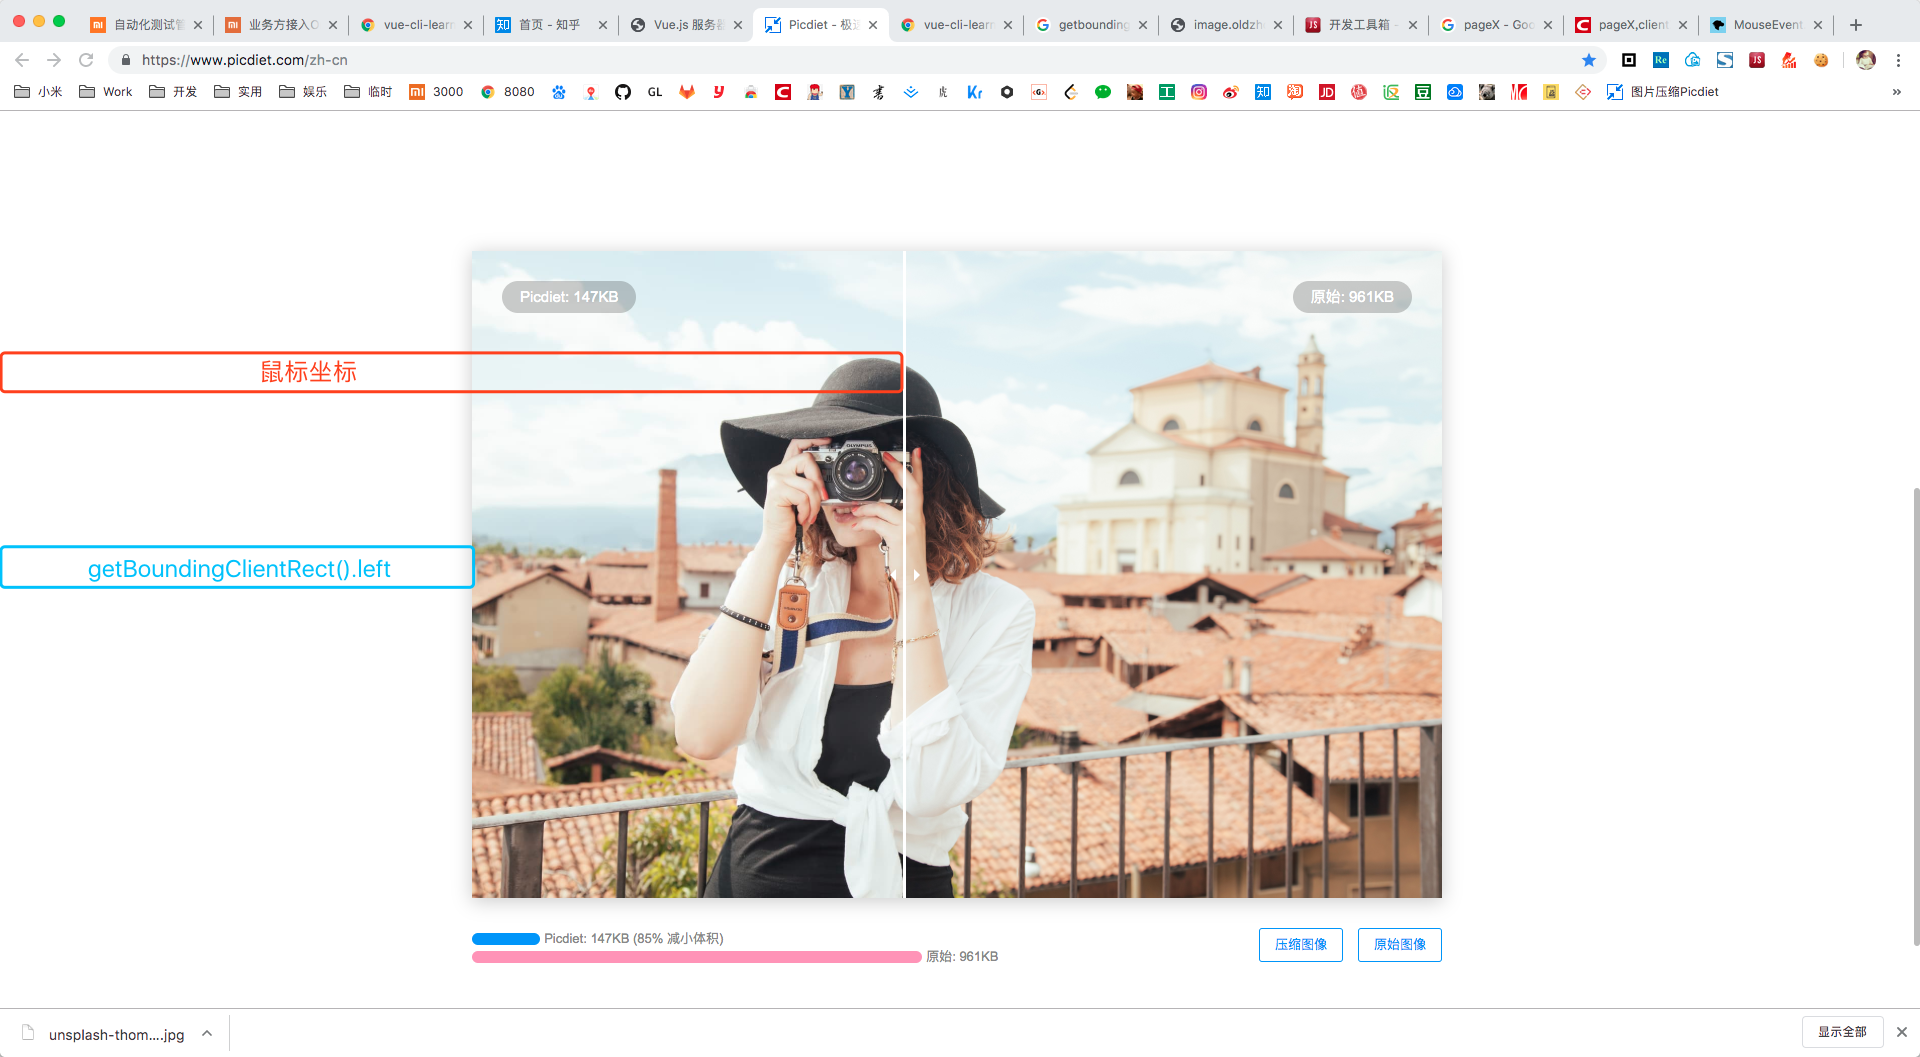
如果能确保页面没有横向的滚动条时,可以直接使用e.clientX来获取鼠标的坐标值,e.clientX获取的是相对于浏览器窗口的坐标值,与滚动条区域的位置尺寸无关:
1
2
3
4
5
6
7
8
9
10
11
12
13
14
15
16
17
18
19
20
| mounted() {
const {left, width } = this.$refs.imgContainer.getBoundingClientRect();
this.containerX = left;
this.containerWidth = width;
},
methods: {
mouseMove(e) {
const min = 0, max = this.containerWidth - this.separatorWidth;
const result = e.clientX - this.containerX;
if (result <= max && result >= min) {
this.separatorX = result
} else if (result < min) {
this.separatorX = min
} else {
this.separatorX = max
}
}
},
|
但是如果出现横向滚动条时,就需要考虑window.scrollX,并且获取鼠标使用e.pageX,它会将滚动区域的尺寸计算在内。并且由于滚动条移动时,getBoundingClientRect结果页在发生变化,所以还需要判断是否移动了滚动条,优化之后如下:
1
2
3
4
5
6
7
8
9
10
11
12
13
14
15
16
17
18
19
20
21
22
23
24
25
26
27
28
29
30
31
| mounted() {
this.getBoundingClientRect()
},
methods: {
getBoundingClientRect() {
const { left, width } = this.$refs.imgContainer.getBoundingClientRect();
this.containerX = left;
this.containerWidth = width;
this.scrollX = window.scrollX
},
mouseMove(e) {
if (this.scrollX !== window.scrollX) {
this.getBoundingClientRect();
}
const min = 0, max = this.containerWidth - this.separatorWidth;
const result = e.pageX - this.containerX - window.scrollX;
if (result <= max && result >= min) {
this.separatorX = result
} else if (result < min) {
this.separatorX = min
} else {
this.separatorX = max
}
}
},
|
剩下的部分,通过重叠两个图片的容器
1
2
| <div class="origin-image" :style="{ 'width': originWidth + 'px'}"></div>
<div class="handled-image" :style="{ 'width': handledWidth + 'px'}"></div>
|
通过separatorX分别计算两个容器的宽度:
1
2
3
4
5
6
7
8
| computed: {
originWidth() {
return this.separatorX
},
handledWidth() {
return this.containerWidth - this.originWidth - this.separatorWidth
}
}
|
最后实现的效果将它的官网没考虑到的滚动条的情况也处理了(虽然这种情况非常少见)。将这个demo替换成为了一个插件的形式,便于复用,完整的代码在这里。
参考