零散专题10 Fetch API

Fetch是基于Promise设计的,是属于window对象的方法,可以用来替代Ajax。旧浏览器不支持Promise,需要使用Polyfill进行处理 。

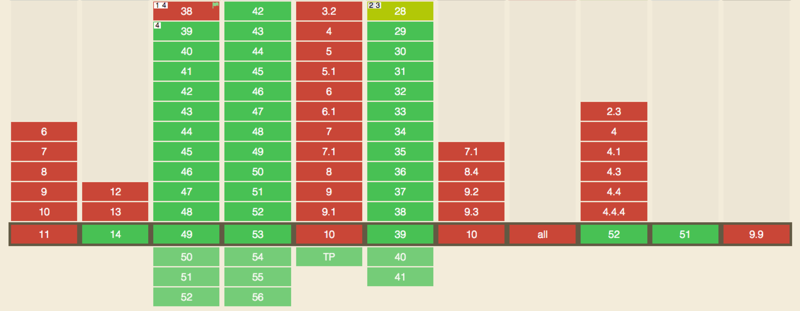
兼容性
ajax08.png

目前浏览器对Fetch的原生的支持率并不高,幸运的是,引入下面这些polyfill后可以完美支持IE8+ :

  • 由于IE8是ES3,需要引入ES5的polyfill: es5-shim, es5-sham
  • 引入Promisepolyfill: es6-promise
  • 引入Fetch探测库:fetch-detector
  • 引入Fetch的polyfill: fetch-ie8
  • 可选:如果你还使用了Jsonp,引入fetch-jsonp

如果在Node使用,还需要安装node-fetch模块。

使用

一个基本的Fetch请求如下:

1
2
3
4
5
6
7
fetch('http://example.com/movies.json')
.then(function(response) {
return response.json();
})
.then(function(myJson) {
console.log(myJson);
});

也可以通过Request构造器函数创建一个新的请求对象,这也是建议标准的一部分。第一个参数是请求的URL,第二个参数是一个选项对象,用于配置请求。请求对象一旦创建了,便可以将所创建的对象传递给fetch()方法,用于替代默认的URL字符串。示例代码如下:

1
2
3
4
5
6
7
const req = new Request(URL, {method: 'GET', cache: 'reload'});

fetch(req).then(function(response) {
return response.json();
}).then(function(json) {
insertPhotos(json);
});

上面的代码中指明了请求使用的方法为GET,并且指定不缓存响应的结果。

参数

fetch接受两个参数:

  • 第一个参数是请求的目标URL
  • 第二个参数是一个配置项对象,包括所有对请求的设置,可选参数有methodheadersmodecredentialscache

关于参数的详细说明可以参考MDN的文档

返回值

Fetch的返回值是一个Promise对象,当这个Promise对象resolve时,在then方法中获得的是一个Resopnse对象。

Response对象中包含了当次请求的相应数据,需要调用对应的方法将Response对象转换为相应格式的数据,最常用的就是json()方法,它将返回一个被解析为JSON格式的Promise对象,并将Response对象设置为已读。

Response对象常用属性包括headersokredirectedstatusstatusTexttypeurl等,常用的方法包括clone()error()formData()text()等,具体的说明参考MDN的文档

与 Ajax 的区别

Ajax是基于XMLHttpRequest对象来发送网络请求、获取数据的。

Fetch是基于Promise设计的,是属于window对象的方法,可以用来替代Ajax。

使用原生的Ajax发送一个JSON请求一般是这样:

1
2
3
4
5
6
7
8
9
10
11
12
13
14
15
16
var xhr = new XMLHttpRequest();
xhr.open('GET', url);
xhr.responseType = 'json';
xhr.send(null);

xhr.onredaystatechange = function() {
if (xhr.readystate === 4) {
if (xhr.status === 200) {
console.log(xhr.response)
}
}
};

xhr.onerror = function() {
console.log("Oops, error");
};

使用Fetch来进行同样的操作:

1
2
3
fetch(url).then(response => response.json())
.then(data => console.log(data))
.catch(e => console.log("Oops, error", e))

可以使用Async/Await来实现“

1
2
3
4
5
6
7
8
try {
let response = await fetch(url);
let data = response.json();
console.log(data);
} catch(e) {
console.log("Oops, error", e);
}
// 注:这段代码如果想运行,外面需要包一个 async function

总结起来,Fetch与Ajax的主要的不同点在于:

(1)Fetch基于Promise对象,Ajax基于XMLHttpRequest对象

(2)当收到代表错误的HTTP状态码时(4xx/5xx),从fetch()返回的Promise不会被标记为reject,而是标记为resolve(但是会将resolve的返回值的ok属性标记为false),仅当网络故障时或请求被阻止,才会标记为reject;

来看下面的Fetch请求:

1
2
3
4
5
6
7
8
9
10
11
12
fetch('http://127.0.0.1:7001/getTitle')
.then(v => console.log('resolve, v.ok = ', v.ok))
.catch(e => console.log('reject', e));

// 当服务器返回结果正常(200)时,返回结果:
// resolve, v.ok = true

// 当服务器返回结果异常(500)时,返回结果:
// resolve, v.ok = false

// 当网络故障或请求被阻止时(设置跨域失败),返回结果:
// reject TypeError: Failed to fetch

当使用原生的Ajax时:

1
2
3
4
5
6
7
8
9
10
11
12
13
14
15
16
17
18
19
20
21
22
23
24
25
26
27
const xhr = new XMLHttpRequest();
xhr.open('GET', 'http://127.0.0.1:7001/getTitle');
xhr.send();

xhr.onreadystatechange = () => {
if (xhr.readyState === 4) {
if (xhr.status === 200) {
console.log('success', xhr.status);
} else {
console.log('error', xhr.status);
}
}
};

xhr.onerror = (e) => {
console.log('onerror', e.type);
}

// 当服务器返回结果正常(200)时,返回结果:
// success 200

// 当服务器返回结果异常(500)时,返回结果:
// error 500

// 当网络故障或请求被阻止时(设置跨域失败),返回结果:
// error 0
// nerror error

现在使用比较多的axios也是基于原生的XMLHttpRequest对象进行的封装,它可以在Node中使用(Fetch不行),它的行为比起Fetch更加合理,当收到代表错误的HTTP状态码时(4xx/5xx),从axios()返回的Promise会被标记为reject,

1
2
3
4
5
6
7
8
9
10
11
12
13
14
15
16
17
axios.get('http://127.0.0.1:7001/getTitle')
.then(v => console.log('resolve', v.data))
.catch(e => console.log('reject', e));

// 当服务器返回结果正常(200)时,返回结果:
// resolve {title: "OK"}

// 当服务器返回结果异常(500)时,返回结果:
// reject Error: Request failed with status code 500
// at createError (createError.js:17)
// at settle (settle.js:19)
// at XMLHttpRequest.handleLoad (xhr.js:78)

// 当网络故障或请求被阻止时(设置跨域失败),返回结果:
// reject Error: Network Error
// at createError (createError.js:17)
// at XMLHttpRequest.handleError (xhr.js:87)

(3)默认情况下,Fetch不会从服务端发送或接受任何cookie,要发送cookie,必须设置credentials选项。而AJAX请求默认自动带上同源的cookie,不会带上不同源的cookie。可以通过前端设置withCredentialstrue、后端设置Header的方式来让Ajax带上不同源的Cookie

fetch发送Cookie

为了让浏览器发送包含凭据的请求(即使是跨域源),要将credentials: 'include'添加到传递给fetch()方法的init对象。

1
2
3
fetch('https://example.com', {
credentials: 'include'
})

果你只想在请求URL与调用脚本位于同一起源处时发送凭据,请添加credentials: 'same-origin'。要改为确保浏览器不在请求中包含凭据,请使用credentials: 'omit'

例子

上传JSON数据

1
2
3
4
5
6
7
8
9
10
11
12
const url = 'https://example.com/profile';
const data = { username: 'example' };

fetch(url, {
method: 'POST', // or 'PUT'
body: JSON.stringify(data), // data can be `string` or {object}!
headers: new Headers({
'Content-Type': 'application/json'
})
}).then(res => res.json())
.catch(error => console.error('Error:', error))
.then(response => console.log('Success:', response));

上传文件

可以通过HTML<input type="file" />元素,FormData()fetch()上传文件。

1
2
3
4
5
6
7
8
9
10
11
12
var formData = new FormData();
var fileField = document.querySelector("input[type='file']");

formData.append('username', 'abc123');
formData.append('avatar', fileField.files[0]);

fetch('https://example.com/profile/avatar', {
method: 'PUT',
body: formData
}).then(response => response.json())
.catch(error => console.error('Error:', error))
.then(response => console.log('Success:', response));

获取图片

下面这个例子,是在React中,使用fetch获取图片,并将图片转换为Blob对象,赋给<img>src,在页面上展示图片:

1
2
3
4
5
6
7
8
9
10
11
12
13
14
15
16
17
import React, { useState, useEffect, useRef } from 'react';
import fetch2 from './fetch2.png';

export default function Statistics() {
const [src, setSrc] = useState('');
useEffect(() => {
fetch('fetch2.png').then(v => v.blob()).then(v => {
setSrc(URL.createObjectURL(v));
});
}, [param]);

return (
<div className={styles.container}>
<img src={} />
</div>
);
}

使用Fetch需要注意的问题

  1. 考虑Fetch兼容性(IE浏览器不支持Fetch)
  2. 考虑环境对Promise的支持情况
  3. 如果在Node中使用需要安装node-fetch
  4. 服务端返回错误时(4xx/5xx),Fetch不会reject,可以通过返回的Response对象的OK属性判断
  5. 默认情况下Fetch不会接受或者发送Cookie,需要使用credentials选项开启

参考